Showing posts with label food time. Show all posts

Saturday, September 13, 2014

Food Pornin'

I noticed that I haven't been talking about food lately (my no. 1 passion). I have somewhat abandoned my other blog about food, Gula & Garam, since like who has the time to commit to 2 blogs, let alone 1?

Anyways, since I graduated ProBaking 1 last March, I have been experimenting on baking and cooking. Lately I have been drawn more on learning how to perfect a cake and actually learning more on Korean food. I swear I am secretly Korean... Maybe in my past life!

I made some Spinach and Bean Sprout Korean Side Dish. Mother went ham on this. It was so good consuming this with a bowl of hot rice and spam. #droolz
These cupcakes were made for a baby shower with a Superman theme (hence the colored frostings). 
One day I was craving Beef Teriyaki. Then I went to the store, bought beef and duh, made Beef Teriyaki. Again, Mother went ham on this. 
This naked Carrot Cake was made for a baby shower at work for a fellow nurse. Her baby's name was Ella, but after the birth of the baby girl, we found out she named her Kennedy Ella. How freakin' adorable is that name?!?!
My Assist. Manager at work challenged me to make a layered Pineapple Upside Down cake. I have never had or made this cake before and now I know why this is a classic American cake. Hot damn this cake was glorious. So for this cake, the top was the Upside down cake and the layers were Vanilla cake with whipped buttercream & crushed pineapples in between. #winner
Another Korean dish. During that nurse's baby shower, my little Korean nurse made Japchae. I asked her what in the world is this noodle dish because it was divine. I made some at home and of course, Mother went ham on it. I ended up making 2 huge foils of this for my church's potluck.
One Sunday morning, Mother wanted Pancakes. She woke me up on a deep sleep (uh, thanks). Mother wants pancakes, Mother gets pancakes. I ended up feeding the whole house. These were so fluffy, even Chimmy was jealous. I really need to practice on flipping dem jacks though!
I made Baked Zucchini & Corn Pasta and it was a hit at home & at work. 

I really do miss taking cooking/baking classes. Unfortunately I can not continue to take ProBaking 2. My school decided to merge ProBaking 1 & 2 into just, ProBaking. I was really sad when I found out about it, but what do you do. Good thing there is Craftsy.com but I still do miss having the human interaction. I guess I will browse around for other classes, like a 1 day course (thru Sur La Table or other schools), and maybe browse on the interweb for future classes/school in Zurich. 

I hope I didn't make you hungry!
- Rima

Sunday, July 7, 2013

Food Time: Baked (pocket-size) Apple Pies

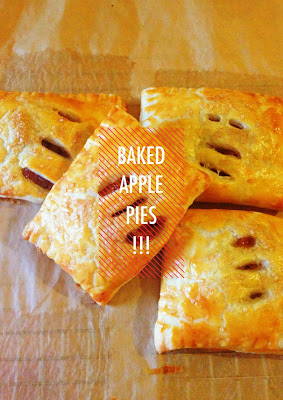
As part of my 12 Things, my goal was to make pie. And boy I did make pie. But not your traditional pie in a pie dish. I'm too lazy. I'm a person on the go, so why not make some hand-held pies?

My fat father is a big fan of Apple Pies. When he's craving, he goes to Mickey D's for some of their Apple Pies. I, too, do the same thing. A quick fix, you know?

So in the spirit of 4th of July, I did made some Apple Pies. Not too bad for my first try. Of course they were gone within a day (I made enough for 8-10 people. We're a party of 4. Family of fatties). Then my mother texted me on Friday while I was at work.

Ma: "Rim... buat pie lagi dong.... hhmmmm" translation: "Rim, can you make more pie... hhmmmm"
Me: "Lol. I'll make it again. Penasaran soalnya" translation: "Lol. I'll make it again. I'm still curious."
Ma: "Make it yang manisan kayak sirup itu apelnya or bluberries..." translation: "Make it sweeter like syrup for the apple or bluberries..."
Me: "Blueberries!"
Ma: "or strawberries?"
Ma: "Or banana..."
Ma: "Hhhmmmmm... yuummm"

From there I can tell that she has a mouthgasm just by texting to me about pies. My phone went crazy from her single texting. Grr.

Anyways, so I did make pies. Apple pies, since I have left over apples. The pie crust recipe that I used for this one is from Deb of Smitten Kitchen (LOVE HER LOVE HER LOVE HER). Like her, I don't really like using shortening. I only use it for vegan recipes and for making Whoopie Pies. I'm all about butter, people. And her recipe came out flawless. Love the flakiness of the crust. Hmmmmmm...

baked apple pies square turnovers

And for the filling, I used Betty of Yummy Workshop's version, but I added a little more of Cinnamon and used Gala Apple in addition to the Granny Smiths. It's similar to McDonald's fillings. Yum.

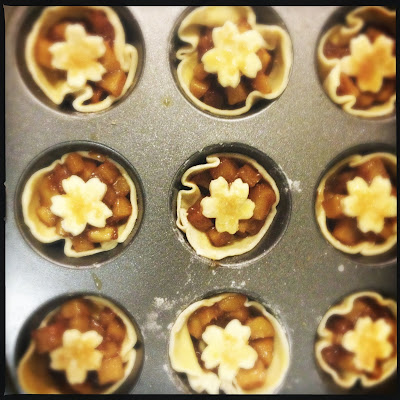
Of course, knowing me, I love Muffin/Cupcakes. I have a tons of muffin tin so I made some in it. It turned out so cute.


I used a Sakura cookie cutter for the topper. Yum.

Baked (pocket-size) Apple Pies
Makes about 8 - 10 squares handheld Pies or 20 - 24 Muffin Tin Pies

Crust: I recommend just clicking here to follow Deb's recipes and method on how to make that awesome flaky, buttery pie crust. She explains it really well.


And yes I followed her method to the T. The dough was pretty sticky but moldable. I split the dough in half. Used 1 half for the handheld pies (I got 4 pcs) and the other half for the Muffin Tin (I got 12 pcs).

Filling: you can follow Becky's here or my adapted version below

  • 2 Granny Smith Apples & 1 Gala Apple - washed, peeled, cored and cut in to 1/2" cubes
  • 1/3 cup of dark brown sugar
  • 3 tablespoon of unsalted butter
  • 1/2 teaspoon of grown Cinnamon
  • 1 tablespoon Lemon Juice
  • 3 tablespoon of Water
  • 1 tablespoon of Cornstarch
Topping: Egg Wash, Turbinado Sugar (I used Sugar in the Raw) and Cinnamon

In a medium saucepan, mixed in apples, brown sugar, butter and cinnamon. Heat under medium-heat until butter melts. Toss well, coating to make sure all apple bits are evenly covered with sugar & cinnamon. Once butter is melted, add the lemon juice and 1 tablespoon of water. Reduce heat to low-medium and cover for 10 minutes. Occasionally stir the apple.

Then whisk the cornstarch with the remaining 2 tablespoon of water and add to the apples. Stir well and cover for another 2 - 3 minutes. You will see the juices to become more jelly/syrup-like. Turn off heat and set aside. 

Preheat your oven to 400 F. Line a baking sheet with parchment paper and/or spray coat a muffin-tin

Once your crusts are ready to use (I left mine in the fridge over night), start shaping them! 

tip: your dough must be cold and so does your surface. If your dough becomes too soft and gooey, place it back in to the freezer for a couple of minutes, until semi-hard. It is a pain in the ass. Thank goodness I have a marble pastry board. I've read around, some people would put ice packs on top of their surface to keep it cold.

Using my rolling pin, on a floured surface, I rolled 1 half of dough to about 1/8 inch, and cut them in to 4 rectangles. Egg-wash the edges (this will be your seal), and fill the dough with about 1 heaping tablespoon in 1 half of the rectangles. Fold the dough, covering the apples, and seal the dough with a fork. Then cut 2-3 slits on top of the pie for ventilation. Egg-wash the pies, sprinkle with the turbinado sugar and cinnamon. Place in the fridge for about 15 minutes. Bake for 20 minutes. (for more info on how to assembling the pie, Deb has a great method here)

For the Muffin-Tin, just like above, roll the dough to about 1/8 inch and I cut the dough using a biscuit cutter or a wide-mouth mason jar, making about 10 - 12 circles. I flattened them with my fingers, egg-wash them and place them in the prepared muffin-tin. Then spoon a heaping tablespoon in to the pie cups. Then with the scrapes, I use a sakura-shape cookie cutter to cut the toppings for the pie-cups. Then egg-wash again and sprinkle with turbinado sugar & cinnamon. Bake for 20 minutes and let rest in pan until cool on top of a wired cooling rack. 


Deb's crust recipe came out so good. Flaky and yummy. Top your pie with Vanilla ice cream. Whoa.


moonbeams,
Rima

Monday, May 20, 2013

JM's Detox Water

Imagine this girl screaming at your face...

via tumblr
Oh lawd.

Anyways, that fine lady up there has a Detox Water recipe that claimed to help you lose up to 5lbs in excess water in 7 days... Bloated? Try it.

You will need:

  • 60 oz of distilled water
  • 2 tablespoon of lemon juice/water
  • 1 tablespoon pure cranberry juice (unsweetened please)
  • 1 bag of Dandelion tea
Put it in a jar, let it fuse in the fridge and drink up thru out the day.


I used the Yogi DeTox tea. It does have an acquired taste, but it's not too bad. I sweetened mine a bit with stevia and it's pretty fresh on a hot day. 

 
I like pretty water so I added frozen strawberries and some mint leaves. It does make the water/tea taste better & fresh. 

This recipe is all over Pinterest and I've read some blogs and they claim that this water works. I'm pretty intrigued on trying this for a week, since I feel bloated all the time.

I will let you know on an update!

hopefully-bloat-free,
Rima

Saturday, April 13, 2013

Food Time: Banana Swirl Muffin


hashtag nomnomnom.

You know that I love Trader Joe's Cookie Butter. AANNDDD of course the infamous gooey, sticky, partay-in-my-mouth nutella. Combined that in a banana muffin, you got Heaven in your Mouth. True Story.

Grab some uber-ripe bananas and let's get to it!

Banana Swirl Muffin
makes 12 muffins

You will need:

  • 2 cups of all purpose flour
  • 1 1/2 teaspoon baking soda
  • 1 1/2 teaspoon baking powder
  • 1/2 teaspoon salt
  • 3 uber-ripe bananas, mashed
  • 3/4 cup of sugar
  • 2 eggs, beaten
  • 1/2 cup of melted butter, cooled
  • Nutella & Cookie Butter
Preheat Thy oven @ 375F. Line your muffin tin with muffin cups, set aside.
Combine the dry ingredients in a large bowl and set aside.
Beat the wet ingredients in a smaller bowl.
Now, add the wet ingredients to the dry ingredients, mix until moistened. 
Spoon batter in to muffin cups, about 2/3 full.
Now the fun part! Add 1/2 teaspoon each of Nutella & Cookie Butter on top of the Banana Batter. Then swirl with a toothpick (I used a chopstick).
Bake for about 16 - 17 minutes, until a toothpick inserted comes clean.
Let it cool on a wire rack, and then ENJOY!!!!!!!!!!!!


The result was bomb! The muffins were moist even on the next day! 
I'm pretty sure substituting the Cookie Butter & Nutella with Strawberry Jam would be splendid. Hmm...

moonbeams,
Rima

Tuesday, March 26, 2013

Food Time: Strawberry Jam filled Madeleines

As you may know, I'm still have the  Parisian/French bug in me. All I think is about the Eiffel Tower, eating croissants and sipping on some coffee.

Seriously.

As you may know (again), that I'm a fan of the uberly cute Rachel Khoo. Of course I have her book. Of course I've seen the episode where she made Madeleines.


The recipe is easy to make. In the video above she uses fresh raspberries and lemon curd. Nom. I didn't have any of those two in hand, so I opted to use my favorite jam (again, my Airbnb host got me addicted to this!) from France, Bonne Maman.


And this Preserve is delicious. Not too sweet with a little tang. Yum. I ate some this morning over toast and chocolate butter. Yes, chocolate butter... all the way from Wisconsin. Double yum.

The sweet Evani, as part of the hellobox, sent me a Madeleine pan. I was sooo happy. Funny thing was the day prior receiving her package, I bought one pan myself. And I used both today and honestly, Evani's was way better. The madeleines just slided off the pan!

The pan from Evani :) 


I was sooo happy on how it turned out. And as Rachel said, it's wayyy better to eat it straight out of the oven. It's sooo soft, the hint of lemon from the cookie smells so good, especially with the strawberry jam combined.

You can fill it with pretty much anything you want (Nutella?) or have them covered or dipped in chocolate ganache. Oh my.

Strawberry Jam Madeleines
you get about 22 - 24 madeleines
adapted from Rachel Khoo, The Little Paris Kitchen

  • 3 eggs, room temperature
  • 2/3 cup of Sugar
  • 1 1/2 cups all-purpose flour
  • 2 tsp baking powder
  • Zest of 1 lemon
  • 1 1/2 tbsp honey
  • 1/4 cup of full fat milk
  • 13 tbsp butter, melted and cooled
  • Jam for filling or if you prefer to dip them in chocolate :)
  • Powdered sugar for dusting
Whisk/Beat eggs and sugar until pale and frothy. In a separate bowl, mix the flour, baking powder and lemon zest. Mix honey and milk into the cooled butter then whisk in to the eggs. With a spatula, fold in the flour-mix in 2 batches. Covered with saran wrap and let it rest in the fridge. I did for at least 1 hour.

Preheat oven at 375F. Get your Madeleine pan and butter and flour dust. Spoon about 1 tbsp into each hole. Then spoon about 1/2 tsp of your filling in the middle of the madeleine batter. Don't overfill. Bake for 5 minutes. Turn off your oven and let rest for a minute or so. Then turn oven on to 325F and bake for another 5 minutes. 

Remove from oven and transfer those luscious cookies on to a cooling rack. Once cool, dust them with powdered sugar and eat with a cup of tea :) Mmm Earl Grey Tea.


I love Vanilla. So probably next time I'll add like a teaspoon of Vanilla Extract. Ooooooooo... Or maybe substitute 1/3 cup of sugar with Lavender Vanilla Sugar... OOOOOOOOOOO. It's on, people.

Head on to your kitchen and make these yummy treat :)

floured face,
Rima

Tuesday, February 19, 2013

Food Time: French Macarons!!!!

Well well well... It's time again for Food Time. This time, it's the lovely yet pain in the ass French Macarons!

A co-worker requested this over the week, so since it was a 3 day weekend, I was like "haaaay letz do this!"

Girls (and dudes)... This pretty cookies are annoying(-ly awesome). My first batch was a big failure, only 12 shells out of 50 that were okay (recipe is from this book). I tried the Italian Meringue method and the batter came out way to watery because I believe I overmix during the Macaronage. Womp Womp. Piping the batter was hell because it kept on leaking thru my piping bag, also making the macaron circles waaay too big :( Then I had a problem with the baking temperature and time. For some reason, with this book's temperature and time, the macarons came out a tad bit burnt, or like it was heading there. Then, I don't know if it's because of the size of my macaron or my over-folding of the batter. Boo.


So for the first batch, it's Vanilla Bean Macaron with Dundee's Lemon Curd from the UK. I've never had Lemon Curd before, so it's pretty interesting to me. Sweet, a little tart with a tang to it. Sounds yummy on a toast and a cup of tea. Hmmm... At least these macs came out with Feet! Woo!

Being a the little perfectionist in me, I was so bummed with the first batch, I decided to make another batch (recipe is from this book). Talk about dedication. Now this batch came out waaaayyy better. I used the French Meringue method. I followed the author's techniques to the tee, but I still felt that the batter was too watery for me. So I'm not sure if I did over-fold during the Macaronage, I don't think I did, but who knows. These cookies are known to be Pretty Bitches aka temperamental.


For this one, I just add Pink Rose food coloring and it's still Vanilla Bean Macarons, this time with Bonne Maman Wild Blueberry Jam from France. Yum. Not too sweet, has a little tang to it as well. I'm glad these came out way better than the first batch. I see the Feet!


At one point, I decided to mix the lemon curd with the blueberry jam!


Even Chimmy wants a piece but he ain't getting one!

Macarons ingredients are pretty basic: Almond Meal, Powdered/Confectioner Sugar, Granulated Sugar and Egg Whites. Then the method for the Meringue could be with heat (Italian) or without heat (French). Everyone has their own version of the recipe... Some add Cream of Tartar... Some add Powdered Egg Whites.

There's the mixing stage aka Macaronage. Followed by piping! Then there's the tapping aka banging (I like to bang!) of the cookie sheet on to the country to eliminate air bubbles. Then the resting aka drying period. Then the Temperature and Baking time. EVERYONE IS DIFFERENT. It's frustrating! One will say 375F... or 350F... or 300F... I don't know, people. I was literally pulling my hair.

Seriously, guys, it's totally a Trial and Error type of cookies to make.

I youtube'd macarons, and this cute one came out. She does the French Meringue technique. Doesn't she make it like it's super easy? I kid you not, this is my second and third attempt, and it may look easy. It is pretty easy. It's the macaronage part that's tricky.


Cool thing about macarons is that the color, flavor and fillings are endless.

Fun Fact: I was in the kitchen from 9AM to 5PM. Yes people. I was there for a whole banker shift! (and I did not complain at all. Guess I know where my heart it... Baking!)

I will try to make this again when I have the time. Honestly, I'm not a big fan of macarons, I like them because they just look so cute. They're just too sweet for me, and I believe is because of the amount of powdered sugar in the ingredients. I'm such a bread/cupcake girl. But I'm seriously thinking on taking a class on Macarons soon once I get back from Paris.

Wait... Maybe I should take a Macaron class in Paris... Nah. I signed up for Croissants. Croissants > Macarons anytime.

via parisvsnyc
Helene from Tartellete a little ebook on Macarons. Check it out!

Seriously, that quote "Practice makes Perfect" applies to Macarons!

Have any of you made these bad ones before?

moonbeams,
Rima

Sunday, January 27, 2013

Food Time: Chouquette

So I set my DVR for The Little Paris Kitchen: Cooking with Rachel Khoo, and there was an episode on her making these scrumptious pastry puffs.

Sweeten: Chouquettes
Savory: Gougères


After watching that, I thought, "Oh haaay it's so easaaay"... So I literally did a last minute baking sesh. This fun puffs are so easy to make, they are also so easy to eat. It's DANGEROUS. You just want to pop those in your mouth. It's great to eat them with a cup of tea.

Gougères & Chouquettes
Chouquette: with powdered sugar and chocolate chip/white chocolate chip

Gougère: shredded cheese

You really don't need to have a mixer for this. Your mixer will be a wooden spoon and your Right (or Left) Bicep. Seriously. 

Chouquettes
makes: 30 - 40 puffs

What you need: 
(what's in parenthesis is my "guess"- timation for the US metric system; I rounded them up because it gave me some odd numbers)
  • 170 ml of Water (3/4 cup)
  • 170 ml of Milk (3/4 cup)
  • 1 tsp Salt (add 1/2 tsp more)
  • 1 tsp Sugar (add 1/2 tsp more)
  • 100 grams of Butter (8 tbsp)
  • 170 grams of Flour (3/4 cup)
  • 2 eggs (add 1 more egg)
  • Icing Sugar for Dusting
  • Pearl Sugar/Chocolate Chip for Decor
    • Stove and Saucepan 
    • Wooden Spoon
    • Pastry Bag
    • Large Mix Bowl
    • Your strongest Bicep or Your Husband's
For directions, literally watch Rachel's video. She does it so well. 

Preheat your oven @ 200 C/400 F. Line your baking sheet with parchment paper.
If you don't have a piping bag, you can use 2 spoons to spoon the batter.
Bake for 25 minutes until evenly browned and rised. 

As for Gougère, omit the Icing & Pearl Sugar, replace with Shredded Cheese.

It's up to you on how big your want your puffs to be. Mine turned out pretty big because of my Piping tip. 

But who cares. It's just plain yummy.

Go and bake now.

moonbeams,
Rima

Wednesday, January 16, 2013

Food Time: Gluten Free Blueberry Lemon Muffins

Mkay. So I'm on a mission. Let me give you an update in the world of Rima.

So I had an epiphany (always on random moments) on Monday night while watching How I Met Your Mother (btw, did anyone watched that episode?!?! The one with Lily & Ted on the rooftop? Sad and heart breaking).

I've been dealing with some allergies issue for the past who knows when. But lately I've been listening and paying attention more to my body. Recently, I've been eating more and more whole wheat grains and I have been baking with Whole Wheat flour more often... Well because it is known that increasing your whole wheat/grain intake is good for your heart, cholesterol, etc etc etc, right?

Wellllll... I've been noticing that my eczema, sinus congestion/allergies and colic/gas pain in my stomach are getting worse this past 3 weeks. I was like, "Hey... What's going on here?" So I did some research and found some correlation between eczema and wheat allergy. I was like, "OH HAAAAYYYY..." I did more research and now am reading "Wheat Belly" by William Davis. So far the book is making sense to me. I don't wanna go in depth, you can read the blog. While his main goal is about weight loss, for me is to see if I'm really allergic to wheat/gluten or not.

So, I'm going Gluten Free for 1 week to see if I'm allergic or not. I want to see if my symptoms decrease/disappear. Then I will slowly try to eat wheat products and see. I'm nervous.

And most of you know, I LOVE BREAD. If I was stranded in an island, I can survive on chocolate bread. Seriously. So I was pretty sad. It's like my health versus my mouth's desire.

Anyways, being the baker I am, I browsed around for Gluten Free stuff/recipe. I purchased The Blackbird Bakery cookbook too. So I went on a shopping spree to my local Sprouts Market (Thank God for that market. TONS of Gluten Free stuffs!) and decided to try out the Pamela's Baking & Pancake Mix.

Since my lemon tree is giving birth to lemons like nobody's business, I decided to make Blueberry Lemon Muffins, just to try the mix out. The Flour mix is interesting. It's not as smooth as regular all purpose flour. It's pretty grainy. I noticed some brown grain which is almond meal. But it doesn't have any weird odor. But overall, the muffins turned out soft and moist. Yum in my department.

Gluten Free Blueberry Lemon Muffins
makes 12


Ingredients:

  • 1/2 cup of butter, room temperature
  • 1 cup of brown sugar - you can use white granulated if you want
  • 2 eggs, room temperature
  • 1 tsp Vanilla Extract- I'm not sure if the one I have is Gluten Free
  • 1 Tbsp Lemon Juice
  • 1 Tbsp Lemon Zest
  • 1/2 Milk - I use Silk Soy Milk
  • 2 cups of Pamela's Baking & Pancake Mix
  • 2 tsp of Baking Powder - OK. I did not read the Mix but apparently it already has Baking Powder & Baking Soda in it (DUH it's a MIX, Rima! Read next time!) So you may wanna omit this... but I'm not sure how it will turn out. I was afraid I made a boo-boo, but the muffins were awesome.
  • 1 1/2 cup of Blueberries
Preheat your oven @ 375F and line up a 12 pc Muffin Tin with cupcake liners, set aside.

If you're gonna use the Baking Powder with the Flour Mix, shift those together to a medium bowl, set aside.

With an electric mixer, beat the butter and sugar until smooth & light. Add eggs, one by one, until incorporated. Add the vanilla, lemon juice & zest until mix well. 

Then add flour mix to the butter, alternating with the milk.

With a spatula, fold in the blueberries. Then divide the batter on to the muffin tin and bake for 20 minutes. Once down, let it cool and voila... Gluten Free Muffins.


It was yummy straight out of the oven. I can taste the lemon, not to tangy, and it blends well with the sweetness of the brown sugar. I don't like my stuff too sweet. 

I think this would be bomb if it was topped with some Brown Sugar Streusel, but I was lazy.

Any of you are on a Gluten Free diet or have problems with Wheat/Gluten?!?!? PLEASE SHARE AND HELP A SISTER OUT. 

So far, I've been eating a lot of fruits and veggies, which is a good thing, no? Hehe.

moonbeams,
Rima

Tuesday, December 25, 2012

Food Time: Chocolate Cookie Butter Cake in a Mug


Aw yea. So Merry Christmas again. I was craving SWEETS after eating tons of Chinese Food for lunch, part of my family tradition for eating out on a holiday. After getting called in to work while I was trying to enjoy my Green Tea Ice Cream, I came home wanting something sweet.

But after baking for 3 hours yesterday, I didn't feel like whipping this or mixing that, so I wanted to make just a cake in a mug.

Then, comes Kirby Cravings. This recipe is an adaptation of her Biscoff Mug Cake, so woo. I don't have Biscoff Spread but I do have Cookie Butter. Nom.

Chocolate Cookie Butter Cake in a Mug


What you need:

  • A oversize mug
  • 3 tbsp of Melted Butter (or Veg Oil, if you prefer)
  • 3 tbsp of Milk
  • 3 tbsp of Whole Wheat Pastry Flour (or All Purpose)
  • 1 tbsp of Ghirardelli Powdered Cocoa (if you don't want Chocolate, just add another 1 tbsp of Flour)
  • 3 tbsp of Brown Sugar (or Granulated White Sugar, if you prefer)
  • 1/4 tsp baking powder
  • 1 egg

After the butter is cooled down from melting, in the mug, whisk together with egg. Once smooth, add the rest of the ingredients, whisk well with a fork until smooth. Microwave for 1:30 - 2 minutes. More than that, the cake gets rubbery. The cake will rise as the time goes, and beware, you'll get excited.

Warning: this recipe calls for 1 egg. Yes, it gets cooked in a microwave, but maybe not long enough to fully cook the egg. The longer you cook the cake, the drier it gets. So make them at your own risk. Make sure you know the source of your eggs to prevent any salmonella exposure. Other than that, try it. 

Top with Whipped Cream if you want. The texture reminds me of sponge steam cake... Soft and steamy. Yum.


This is a good "quicky" fix after a long day at work. 

Moonbeams,
Rima

Wednesday, December 19, 2012

Food Time: Shortbread Cookies


Oh yes. Food. Gotta love food.

Oh yes. Cookies. Gotta love cookies.

Oh yes. Shortbread Cookies. Buttery cookies. Gotta love Shortbread Cookies.


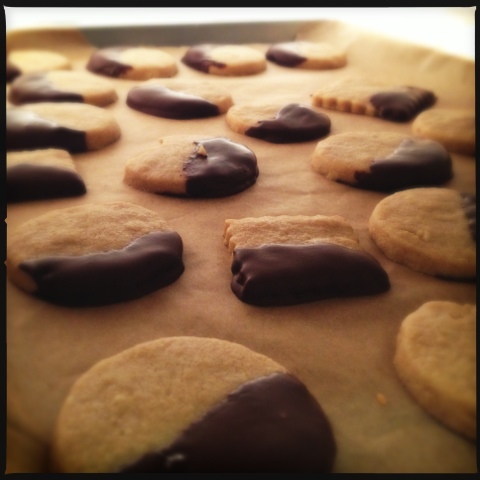
I made these last week because I got some cookie cutters that I just wanted to use. I know, they're just the plain ol' round and square ones. But I've never took the interest to make sugar cookies. I'm a huge shortbread cookies fan. Mmm... buttery cookies melting in my mouth. Nom.

So on my fabulous day off after a rough call night, I stood there in the kitchen for 7 hours! 7 hours for making these cookies?!?! YES! I tried a recipe that I found online and that was a COMPLETE DISASTER! It was SALTY to the point I felt my blood pressure rising! I was sooo bummed after wasting good butter on this failed batch, I dumped the whole dough and made cookies down the trash. I was all happy on how it came out (appearance-wise) but sadly to waste great ingredients.

Being the hard worker me (tee hee), I didn't want to give up (plus I promised my doctor at werk that I was gonna bake something) so I immediately made another batch... Now, with the recipe of one my favorite baker from New York, Sarabeth. I remember going to her bakery at Chelsea Market on my first NYC trip, and purchased a jar of her shortbread cookies. It was BOMBIZZLE. Once I hit Cali, the cookies were gone and sadness appeared. Then thanks to google, I found her recipe online on her website. Score.

Seriously, the ingredients are soooo simple.

Sorry the images aren't the greatest. These were taking at 11 PM, after my back gave up on me.

Shortbread Cookies
makes about 20 - 30 cookies. Depends on your cutter size. Adapted from Sarabeth.

Awesome ingredients:

  • 1 cup of butter, chilled, cut in to small cubes
  • 1/2 cup of superfine/baker/confectioner sugar
  • 1/2 tsp vanilla extract
  • 1 2/3 cup of Whole Wheat Pastry Flour
  • optional: White Chocolate Chips or Chocolate Chips, melted


What to do... What to do...

  • Beat the butter, sugar, & vanilla in a stand mixer with the paddle attachment on medium speed until color is light/pale and fluffy, about 2 minutes.
  • Switch to stir/super low speed, slowly add the flour, mix until dough is just combined. Don't overmix. With your hand (flour them if you may), shape the dough in to a ball.
  • On a lightly floured surface, place the dough on the surface and sprinkle some awesome flour on the top. With a roller pin, roll the dough in to a rectangular or disk, 1/2 inch thick. Wrap with a saran wrap, placed on baking sheet, and refrigerate for about 30 min - 1 hour, until chill and firm, but not hard. Meanwhile, heat the oven at 350F.
  • Sprinkle some flour on top your surface and remove the dough from the fridge. Sprinkle the top with flour. Grap your roller pin, and roll out the dough to 1/4 inch thick.
  • Memo: if the dough cracks, it's too cold. Let it sit in room temp for 5 to 10 minutes. This happened to me!)
  • Now grab your fun cookie cutters, dip them in flour and cut your dough! When you're out of room, reshape the scrapes in to a ball and roll out again and cut!
  • Transfer cookies on to a cookie sheet, make sure you create some space in between cookies. 
  • Bake for about 10 - 12 minutes, until cookies are lightly brown. 
  • Remove from oven, let cool completely on cookie sheet on top of a cooling rack. 
  • If you're gonna dip your cookies in chocolate, like I did, make sure the cookies are completely cooled down. Dip them in the chocolate, placed on baking sheet and refrigerate for about 10 - 15 minutes, until chocolate becomes firm.
  • Now go make some Earl Grey Tea (or this one!), light the fire, grab a novel and eat away.


You can use regular All Purpose Flour if you want. At the time, I just want to use up my Whole Wheat Pastry flour because I didn't have a container for it. Haha. But it actually made the cookies tastier. I loved the texture of the cookies. Feel free to cover the cookies in Royal Icing. I'm pretty sure it'll be good as well.

I still want to master the art of rolling the dough. I want to get a ceramic rolling pin. Hm. get me one please? Like this,


Now I'm hungry. Great.

moonbeamers,
Rima