Hello again. While I'm roaming around the Big Apple in the heat, my friend from Sunny San Diego, Alex from Louise Amabilis has something to share. Thank you for having time to do this girl. I wanna make a teal one and make a huge hair pin/bow out of it. Wooooo. Sound like a legit plan.
If you love vintage or styles from the 40s - 60s, please go visit her blog... or her pinterest. I'm an avid fan :) She also posts about her 2 adorable sons, Ford and Cash (How awesome is that? Super cool names!) who are goofballs in their own little kiddy way (I want to hug both of them). She loves Cookie Butter (who doesn't) and we both share the same love for Bangs. Yes. Bang girls reunite.
---
Hi! My name is Alex and I blog over on Louise Amabilis,
today I'm here filling in for Rima while she's letting out all her wonderful craziness
in the Big Apple! (lucky girl!) I'm going to share a super simple DIY with you guys
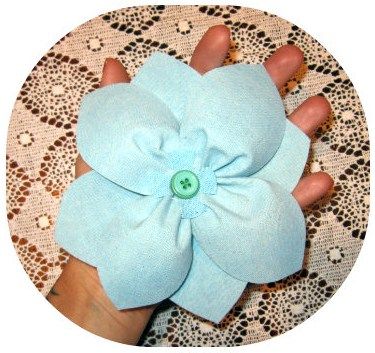
on how to make that pretty flower you see above, I hope some of you might try it out,
it's pretty much fail proof!
So here it goes:

1. Supplies needed: some scraps of fabric, needle, thread, scissors, glue (not shown) and some buttons
2. Fold the edge of your fabric and cut a straight line that curves at the end, when unfolded your shape should look like this
3. Make 8 of these
4. Put your white school glue around the edges of your shapes and rub it all over with your fingers, make sure you get the edges good this will prevent fraying and the middle will get stiffer and hold it's shape once rubbed in let them dry for 5 min.

5. They will still be sticky so place them between 2 pieces of scrap fabric and iron until dry and somewhat stiff
6. Slightly trim the edges
7. With needle and thread gather the flat bottom edge of the petal and keep going into the next one until all are attached to the same thread
8. Pull them all the way onto the thread until you have 4 petals in a circle then spiral them up so that 4 petals are on top as well

9. Hand stitch the center of the flower so that all petals stay in place
10. Cut 2 circles out of your left over fabric the large one will go on the bottom of the flower, the small one will go in the top center
11.Cut 4 little V's out of the smaller circle to make an X
12.Glue it in the center of the flower (for attaching the circle and V I would recommend a hot glue gun for a stronger hold)

13.Hand stitch the buttons on top of the X (I put 2 different color buttons on top of each other)
14.Glue the larger circle to the bottom of your flower
And there you have it!
You made your very own flower : )
Now you can attach it to a hair clip, safety pin, hairband, purse you name it!
You could also make several of these in different sizes to attach to a throw pillow or even a dress.
If you have any questions just let me know and I'll be glad to help you out!
xo
Alex
---
Simple and easy right? Awesome. Fist pump to this awesomeness.
Thanks Alex for posting :)))))) You really deserve a cookie (in a jar?) Go check her out because she is awesome...
How great is that! So simple too! Nice to meet you Alex!
ReplyDeleteEvani
simplyevani@gmail.com
Same here :)
Deletexo
Alex
Ah Alex this is Evani
DeleteEvani this is Alex :)
i can't even do a simple DIY. it's just a mess.haha
ReplyDeleteThis one is pretty much foolproof!
Deletexo
Alex
Thanks for having me Rima!!!
ReplyDeletexo
Alex
Alex!!! Thanks sooo much!!!
Deletewow this is a lovely idea! i'll have to try it!
ReplyDeletei'm glad i discovered your blog <3